How to Create a Chrome Extension: Build Your First Extension in 30 Minutes
 By Basharath
Building a Chrome extension might sound intimidating, but the truth is you can create a fully functional extension with just HTML, CSS, and vanilla JavaScript. No complex frameworks or build tools required. In this guide, we'll walk through creating a simple yet practical todo list extension that you can load directly into Chrome and use immediately.
Whether you're a beginner looking to level up your web development skills or an experienced developer wanting to extend Chrome's capabilities, this tutorial will show you exactly how to create a Chrome extension from scratch.
What is a Chrome Extension?
A Chrome extension is a small software program that extends Chrome's functionality by adding new features or modifying existing ones. Extensions are built using the same technologies as websites: HTML, CSS, and JavaScript. They can interact with web pages, modify their content, or provide standalone features accessible from your browser toolbar.
Chrome extensions are packaged in a specific structure with a manifest file that tells Chrome how to load and run your extension. Once loaded, you can access it from the Chrome toolbar and use it across all your tabs and windows.
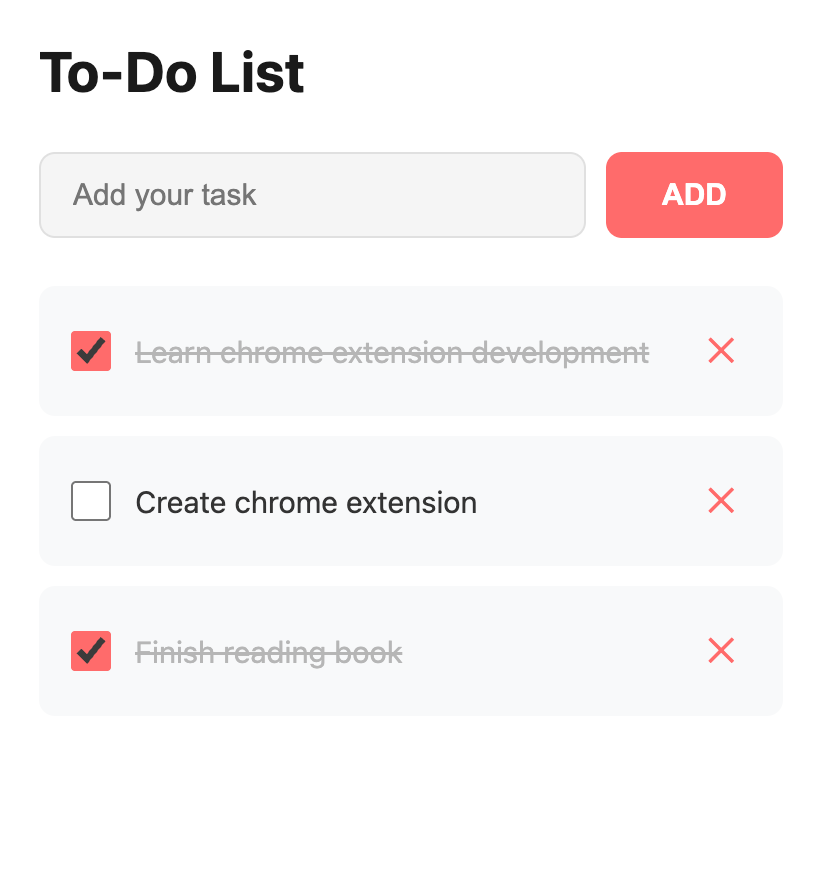
The Simple Todo List Extension We're Building
We'll create a todo list extension that lives in a popup. Users can add, view, and delete tasks. Completed tasks will be visually marked with a strikethrough, and all data persists using Chrome's storage API. The UI is clean, minimal, and actually works as expected.
This is how finished extension looks like:
What You'll Need
The only thing you need is a text editor (VS Code, Sublime, or even Notepad) and Chrome browser. No npm, no build tools, no complicated setup. Just create a folder and add a few files.
Step 1: Create Your Project Folder
Create a new folder on your computer called my-todo-extension. This is where all your extension files will live.
my-todo-extension/
├── manifest.json
├── popup.html
├── popup.css
├── popup.js
└── icon.png
Step 2: Create an Icon File
Chrome requires at least a 128x128 pixel icon for your extension. You can create a simple icon using any image editor, Figma, or an online tool. Save it as icon.png in your my-todo-extension folder.
If you don't have an icon ready, you can create a simple one: just make a 128x128 pixel PNG file with a solid color background and some text or simple design. Chrome needs this icon to display your extension in the toolbar.
Step 3: Create the manifest.json File
The manifest.json file is the most important file in your extension. It tells Chrome essential information about your extension like its name, version, permissions, and which files to use.
Create a file named manifest.json and add the following code:
{
  "manifest_version": 3,
  "name": "Simple Todo List",
  "version": "1.0",
  "description": "A simple and elegant todo list extension",
  "permissions": ["storage"],
  "action": {
    "default_title": "My Todo List",
    "default_popup": "popup.html",
    "default_icon": "icon.png"
  }
}
What this does:
manifest_version: 3 tells Chrome to use the latest manifest format
permissions: ["storage"] allows us to save todos using Chrome's storage API
default_popup points to the HTML file that shows when you click the extension icon
default_icon is the icon that appears in your toolbar
Step 4: Create the popup.html File
The popup HTML is the UI that shows when users click your extension icon. Create a file named popup.html and add the following code:
<!DOCTYPE html>
<html lang="en">
<head>
  <meta charset="UTF-8">
  <meta name="viewport" content="width=device-width, initial-scale=1.0">
  <title>Todo List</title>
  <link rel="stylesheet" href="popup.css">
</head>
<body>
  <div class="container">
    <h1>To-Do List</h1>

    <div class="input-section">
      <input
        type="text"
        id="todoInput"
        placeholder="Add your task"
        autocomplete="off"
      >
      <button id="addBtn">ADD</button>
    </div>

    <ul id="todoList" class="todo-list"></ul>

    <div id="emptyState" class="empty-state">
      <p>No tasks yet. Add one to get started!</p>
    </div>
  </div>

  <script src="popup.js"></script>
</body>
</html>
This HTML creates a clean interface with an input field for new todos, an ADD button, and a list to display todos.
Step 5: Create the popup.css File
Now let's add styling that creates a clean, elegant UI. Create a file named popup.css:
* {
  margin: 0;
  padding: 0;
  box-sizing: border-box;
}

body {
  width: 420px;
  font-family: -apple-system, BlinkMacSystemFont, 'Segoe UI', Roboto,
    'Helvetica Neue', sans-serif;
  margin: 0;
}

.container {
  padding: 24px;
  background: white;
  min-height: 500px;
  border-radius: 12px;
  box-shadow: 0 8px 32px rgba(0, 0, 0, 0.1);
}

h1 {
  font-size: 28px;
  font-weight: 700;
  color: #1a1a1a;
  margin-bottom: 24px;
}

.input-section {
  display: flex;
  gap: 10px;
  margin-bottom: 24px;
}

#todoInput {
  flex: 1;
  padding: 12px 16px;
  border: 1px solid #e0e0e0;
  border-radius: 8px;
  font-size: 15px;
  outline: none;
  background: #f5f5f5;
  transition: all 0.3s ease;
}

#todoInput:focus {
  background: white;
  border-color: #ff6b6b;
  box-shadow: 0 0 0 3px rgba(255, 107, 107, 0.1);
}

#addBtn {
  padding: 12px 28px;
  background: #ff6b6b;
  color: white;
  border: none;
  border-radius: 8px;
  font-weight: 700;
  font-size: 15px;
  cursor: pointer;
  transition: all 0.3s ease;
}

#addBtn:hover {
  background: #ff5252;
  transform: translateY(-2px);
  box-shadow: 0 4px 12px rgba(255, 107, 107, 0.3);
}

#addBtn:active {
  transform: translateY(0);
}

.todo-list {
  list-style: none;
  margin-bottom: 16px;
}

.todo-item {
  display: flex;
  align-items: center;
  padding: 16px;
  background: #f8f9fa;
  border-radius: 8px;
  margin-bottom: 10px;
  gap: 12px;
  transition: all 0.2s ease;
}

.todo-item:hover {
  background: #f0f1f3;
}

.todo-item input[type='checkbox'] {
  width: 20px;
  height: 20px;
  cursor: pointer;
  accent-color: #ff6b6b;
  flex-shrink: 0;
  border-radius: 50%;
}

.todo-item.completed input[type='checkbox'] {
  accent-color: #ff6b6b;
}

.todo-item span {
  flex: 1;
  font-size: 15px;
  color: #333;
  word-break: break-word;
  transition: all 0.2s ease;
}

.todo-item.completed span {
  text-decoration: line-through;
  color: #999;
  opacity: 0.7;
}

.delete-btn {
  background: transparent;
  color: #ff6b6b;
  border: none;
  padding: 6px 8px;
  cursor: pointer;
  font-size: 18px;
  transition: all 0.2s ease;
  flex-shrink: 0;
  display: flex;
  align-items: center;
  justify-content: center;
}

.delete-btn:hover {
  color: #ff5252;
  transform: scale(1.2);
}

.empty-state {
  text-align: center;
  padding: 40px 20px;
  color: #999;
  font-size: 14px;
}

.empty-state.hidden {
  display: none;
}
This CSS creates a modern, clean interface with smooth transitions and a professional look. The container has a subtle shadow and rounded corners, while completed tasks show with a strikethrough and reduced opacity.
Step 6: Create the popup.js File
Now for the JavaScript logic that makes everything work. Create a file named popup.js and add the following code:
const todoInput = document.getElementById('todoInput');
const addBtn = document.getElementById('addBtn');
const todoList = document.getElementById('todoList');
const emptyState = document.getElementById('emptyState');

// Load todos when popup opens
document.addEventListener('DOMContentLoaded', loadTodos);

// Add todo on button click
addBtn.addEventListener('click', addTodo);

// Add todo on Enter key press
todoInput.addEventListener('keypress', (e) => {
  if (e.key === 'Enter') {
    addTodo();
  }
});

function addTodo() {
  const todoText = todoInput.value.trim();

  if (todoText === '') {
    todoInput.focus();
    return;
  }

  const todo = {
    id: Date.now(),
    text: todoText,
    completed: false
  };

  chrome.storage.local.get('todos', (result) => {
    const todos = result.todos || [];
    todos.push(todo);
    chrome.storage.local.set({ todos }, () => {
      todoInput.value = '';
      todoInput.focus();
      loadTodos();
    });
  });
}

function loadTodos() {
  chrome.storage.local.get('todos', (result) => {
    const todos = result.todos || [];
    todoList.innerHTML = '';

    if (todos.length === 0) {
      emptyState.classList.remove('hidden');
      return;
    }

    emptyState.classList.add('hidden');

    todos.forEach((todo) => {
      const li = document.createElement('li');
      li.className = `todo-item ${todo.completed ? 'completed' : ''}`;

      const checkbox = document.createElement('input');
      checkbox.type = 'checkbox';
      checkbox.checked = todo.completed;
      checkbox.addEventListener('change', () => toggleTodo(todo.id));

      const span = document.createElement('span');
      span.textContent = todo.text;

      const deleteBtn = document.createElement('button');
      deleteBtn.className = 'delete-btn';
      deleteBtn.textContent = '✕';
      deleteBtn.addEventListener('click', () => deleteTodo(todo.id));

      li.appendChild(checkbox);
      li.appendChild(span);
      li.appendChild(deleteBtn);

      todoList.appendChild(li);
    });
  });
}

function toggleTodo(id) {
  chrome.storage.local.get('todos', (result) => {
    const todos = result.todos || [];
    const todo = todos.find(t => t.id === id);

    if (todo) {
      todo.completed = !todo.completed;
      chrome.storage.local.set({ todos }, loadTodos);
    }
  });
}

function deleteTodo(id) {
  chrome.storage.local.get('todos', (result) => {
    let todos = result.todos || [];
    todos = todos.filter(t => t.id !== id);
    chrome.storage.local.set({ todos }, loadTodos);
  });
}
Understanding Chrome Storage API
Before diving into the code, let's understand how Chrome's storage system works. Unlike regular web pages that lose data when you refresh, Chrome extensions can store data persistently using the chrome.storage API.
There are two types of Chrome storage:
chrome.storage.local: Data stored locally on your device (what we're using)
chrome.storage.sync: Data synced across all your Chrome instances
The storage API is asynchronous, meaning you need to use callbacks or promises. Every time you want to save or retrieve data, you call chrome.storage.local.get() to read and chrome.storage.local.set() to write.
What this code does:
addTodo() creates a new todo object with a unique ID and saves it to Chrome storage
loadTodos() fetches all saved todos from storage and dynamically creates the UI elements
toggleTodo() finds a specific todo by ID, flips its completed status, and saves the changes
deleteTodo() removes a todo from the array and updates storage
Event handling uses proper
addEventListener()methods for better security and maintainability
Why We Use Proper Event Handling
Instead of inline event handlers like onclick="deleteTodo(123)", we use addEventListener(). This approach:
Prevents XSS attacks by avoiding
innerHTMLwith user contentMakes the code more maintainable and testable
Follows modern JavaScript best practices
Ensures events work reliably across different browsers
Step 7: Load Your Extension into Chrome
Now comes the fun part. Let's load your extension into Chrome:
Open Chrome and go to
chrome://extensions/Enable "Developer mode" by toggling the switch in the top right corner
Click "Load unpacked"
Navigate to your
my-todo-extensionfolder and select itYour extension is now loaded!
You should see your Todo List extension icon in your Chrome toolbar. Click it and start adding todos. Check a todo off to mark it as complete, and click the ✕ to delete it. Everything persists across sessions!
What You've Just Built
You've created a fully functional Chrome extension with persistent storage and a clean, elegant UI. The extension:
Stores data locally using Chrome's storage API that survives browser restarts
Handles all user interactions smoothly with proper event handling
Shows immediate visual feedback for every action
Persists todos across browser sessions and computer restarts
Uses secure DOM manipulation methods that prevent common web vulnerabilities
Works with vanilla JavaScript only - no frameworks needed
Key Takeaways
Creating a Chrome extension is simpler than most people think. You need just a manifest file, HTML for the UI, CSS for styling, and JavaScript for functionality. The manifest acts as your extension's blueprint, telling Chrome exactly what to load and what permissions you need.
The most important part is understanding how Chrome's storage API works and ensuring your data actually persists. Unlike regular web pages, extensions can store data that survives browser restarts, making them perfect for productivity tools like todo lists.
Using proper event handling and secure DOM manipulation methods makes your extension more reliable and secure. The chrome.storage API is your gateway to creating truly useful extensions that remember user data.
Start simple, test frequently, and gradually add features. Once you understand the basics, you can expand to more complex extensions that interact with web pages, manage tabs, or integrate with external APIs.
Happy extending!
Stay Updated
Get the latest Chrome extension tips and tutorials delivered to your inbox.
Written by Basharath
Chrome extension developer sharing insights, tutorials, and best practices for building better browser extensions.